Monday, May 4, 2009

Dancers - Theory Notes

Dancers - Magenta, Cyan and Yellow Filter

Light
White Light is a combination of red, blue, and green, which are the primary colors. If you combine any two if these primary colors of equal amounts, then another color comes. There are three possible colors for primary colors, and so that means that there are three new colors that can be made. Here are the three possibilities:


Red + Green = Yellow
Red + Blue = Magenta
Green + Blue = Cyan


The new colors, yellow, magenta and cyan are called the secondary colors.

Filter
A filter is any substance that takes in light. A filter pass on and show their own color light and also absorb their complementary color of light.

- A yellow filter shows its yellow light and absorbs its complement blue light.
- A magenta filter shows a magenta light and absorbs its complement green light.
- A cyan filter shows cyan light and absorbs its complement red light.


Another type of filter is a neutral density filter and it has equal amounts of yellow, magenta and cyan and it absorbs all color of light. Just like a colored filter, a neutral density filter show their own color of light and absorb its complement color.

Thursday, April 30, 2009

Dancers - Image Bank

Dancers - Image Bank

Shane Sparks - Hip Hop Dancing
Hip Hop
Shane Sparks started dancing when he was 11 and is one of the most wanted Hip Hop dance choreographers in the world today. He is known all over the world and he is an extremely talented choreographer. He is an Emmy Nominated Choreographer and he is one of the most wanted dance choreographers. Ever since he started dancing at the age of 11 he was in talent shows and competitions when he was younger. Shane Sparks is a judge on a few dance shows and he has been a dance choreographer for many Americn dance shows.
This picture as a vey simple background so then yu can focus more on the dance move he is performing. The white background makes him stand out and the lighting doesnt create any hard shadows keeping the picture very simple. The composition is pretty good because his body is a bit diagonal due to the dance move so he covers the whole frame. The angle is simple and pointing right at him but this just helps focus on his move and it does not make any complicated effects.

River Dance
This is a picture of a woman dancing River dancing. The lighting and the setting fir perfectly for the dance and the lighting creates a very cool effect. The light made some contrasts and makes the picture a lot interesting to look at. The light was positioned and so the upper-part of her body is very light and it shows the structure in her body. In River dance it is very important to have a nice structure and body position and so this lighting helps show that. Also the angle of the picture is nice and makes the picture more interesting as oppose to a typical picture taken from right infront. The outfit is a typical River dance outfit representing the culture. 

Ballet
The lighting of this picture is really cool I think because the background is very simple and the dancers' outfits are simple so the lighting makes the picture more interesting and adds a cool effect. The lighting helps you focus on the moves and also the lighting helps to emphasize their structure. The angle taken is simple but it keeps the picture simple so you focus on the positions and moves. The composition is good because both of the dancers fill the frame and they are both positioned well along with the frame. 
Indian Dancing
This is a really cool black & white picture and this picture is pretty simple in the background so you can clearly see the details in the picture. The lighting is pretty cool and you can see the reflection of her in the ground. The angle of the picture is pretty right on but it's pretty good so that the picture doesn't become messy and then you can see details and her position. India has many details in their clothes and other materials and so the lighting and the angle of the picture helps you see all the details in their culture and you see the moves of classical Indian dancing.


Modern Dancing
Modern dancing is a very popular dance today and it has many difficult and intense dance moves. The two dancers are wearing very simple outfits to highlight their movements and what they are doing. The angle is very interesting and from this angle you clearly see the moves they are performing. The lighting creates nice shadows to make the picture nicer to look at and they are pretty light from the 'spotlight'. 

Krumping
This man is dancing a very aggressive style of dance called Krumping. The expression of his face and the body position shows very well the style of dancing. Also the outfit of this dancer shows the culture of this style of dancing. The angle of this picture taken seems to have been taken from beneath. The angle shows the body position and shows the move he is making. The background also represents the hip hop culture and the lighting of this picture is pretty light to show the background and the dancer's move.

Dancers - Diary Entry

Dancers - Diary Entry

This project went relatively well for me. I was able to finish the prints ahead of time! Something that doesn't happen often... I enjoyed taking pictures for this project because I thought it was fun taking pictures of my friend dancing and having a good time. Also, the second model joined and it was fun to see how different their dancing was and still make cool pictures. In the dark room it went pretty quick. In one class I finished the contact sheet but didn't have time to keep working. I thought everything was going well and smooth, until my enlarger wouldn't really work and I had to move over to the 'dark side'. I also had to change the settings of the contact sheet, which actually made me a bit worried, but it went fine. I found the settings for the test-strips rather quickly and it all went pretty smoothly. After a short while I was able to do my big print and after only on trial I was done with my first print, which made me very happy. For my test-strip of my second print I used similar settings, and found the settings for this new picture very quickly. It made me extremely happy when I was done because I wa actually done ahead of time and I'm also very happy that my enlarger has been fixed and i working perfectly fine
.

Wednesday, April 29, 2009

Shutter Speed

Shutter Speed


This is my contact sheet for this project and the settings are:
Aperture: 5.6
Time: 55 s
Filter: No


This is a test-strip of one of the pictures I decided to use from my contact sheet. Although, I changed the aperture and the other settings from the contact sheet, it didn't take long to find the correct settings. Surprisingly, I finished with this print, and the next one in one class. For this print I only had to make two test-strips and the settings for this test-strip are:
Aperture: 2.8
Time: (from top to bottom) 27, 29,31 s
Filter: No


This is the final print. I also used a pretty high shutter speed so that the subjects would not be blurry. The final settings are:
Aperture: 2.8
Time: 27 s
Filter: No
Shutter Speed: 250


This is the test-strip for my second print. I decided to go for it and use the same settings as last print, and it worked out good. The settings are:
Aperture: 2.8
Time: 27 s
Filter: No


This is my second final print for this project. The shutter speed is a bit lower for this picture than the last one, but unfortunately there isn't too much intense movement, so it isn't easy to tell the difference in the shutter speeds. The final settings are:
Aperture: 2.8
Time: 27 s
Filter: No
Shutter Speed: 150 

Monday, March 9, 2009

Flash Unit No. 1 - Pictures

Flash Unit No. 1 - Pictures

During class we had someone to come in so we could take portrait pictures of that person. I took a few that seemed alright, however I'm a bit worried because my first contact sheet I made turned out pretty grey and now I'm worried that all my pictures will turn out a bit grey.

Unfortunately, the portrait picture is not developed yet and so I can not put it on my blog, yet.

Flash Unit No. 1 - Image Bank

Flash Unit No. 1 - Image Bank

Diane Arbus

Born March of 1923 Diane Arbus grew up in Central Park West. When she turned 14, she met her future husband Allan Arbus and four years later they got married. They worked in the fashion industry as photographers and many of her great shots are from that time. Arbus' work in magazines were both very artistic and she got well paid. Arbus' photography career started in 1959 when she had been working with Lissette Model. In 1963 and 193 she received the Guggenheim fellowship for her style. John Szarkowski helped her with her first art exhibition in 1967 at the Museum of Modern Art. While Arbus was doing great and exploring the limits of photographic art her career unfortunately ended by her suicide on July 26, 1971.

I think this portrait picture is very interesting. I really like how she is standing more to one side and I like the shadow in the background. I also really like the models expression of looking a bit sad or upset.

Flash Unit No. 1 - Theory Notes

Flash Unit No. 1 - Theory Notes

Fill-in-Flash
A fill in flash can really help a picture get nicer. Without a fill in flash the subjects in the picture might get some very hard shadows or can be overly backlit so the faces are underexposed which ruins the picture. A fill in flash can also make a picture look much nicer by highlighting the eyes of the subject or adding another nice effect.
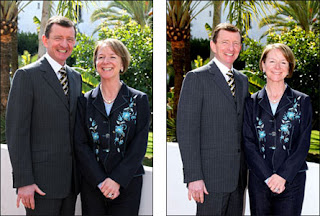
The photographer of these pictures used different settings with the flash. In the picture to the right there was no flash used and the sun gave the light. The picture to the right used a flash and it highlighted the details on the clothes and there is a clear different between the two pictures.
A fill in flash can highlight the subjects and add effects to make the pictures much nicer. A fill in flash is meant to reduce the hard shadows and balance out the light on the subject.

Built-In-Flash
Most digital cameras today have a built in flash.
Today, most digital cameras have a built in flash. The built in flash works for indoors and outdoors. Using it outside can help the picture by softening the eye shadow and the shadow under the chin. A common problem that is created by built in flashes are that often red eyes come when you have taken a photo. Red eyes appear if the flash is too close to the camera lens.

The red eye is caused from reflection from the color of the eye blood vessels in the retina.

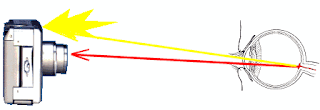
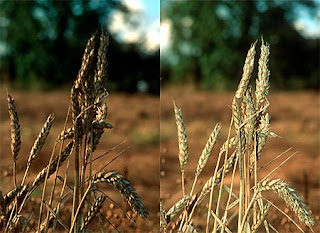
Even though a flash is not required, it is often used and can create another nice effect to the picture. In the picture to the right a flash is used and the wheat stands out.

Flash Guide Numbers
The guide number for an electronic flash helps quantifying its maximum output in terms that a photographer can relate to - aperture and distance. Putting the aperture and and distance (from flash to subject) will give the guide number and the combination will result in enough light for proper exposure.
The three most common ways to use the guide number are:
1)Find the correct aperture for a subject at a given distance when using manual flash
2) Find the maximum distance a flash will properly illuminate the subject at the given aperture
3) Comparing the relative power of the different flash units (higher guide number = more power)